What's In My Beauty Bag

What's In My Beauty Bag
Less shimmery than its well known sister "O", Deep Throat gives the perfect natural peach flush for summer!
BonBon Rose Girls

For Your Review

Want moi to review a product? Email browwhisperer@gmail.com for further info! My reviews are filled with warmth, wit and intelligence- & are always honest!

About Me

My photo
This make-up artist and esthetician has a (bordering on unhealthy) addiction to all things beauty! No amount of eyeshadows or cream liners will ever be enough! I go giddy for all things girly. Lipgloss might not be able to heal the world, but it can lift a gal's spirits!

Take a Button!

Showing posts with label Tutorials. Show all posts

Monday, March 17, 2014

St. Patrick's Day Inspired Eye Make-Up

St. Patrick's Day themed make-up has a time & a place. As a make-up artist I'm comfortable pushing the envelope a bit more than others. For those of you wanting an age & office appropriate look that still honors the green tradition try using something similar to the following:
Using an angled brush dipped in water, I applied a bit of Sleek Cosmetic's Forest eyeshadow from their iDivine Ultra Mattes V2 Darks Palette to my upper & lower lash line winging it out.
I've mentioned Pixi Beauty's Endless Silky Eye Pens & my obsession with them in previous posts. That's saying something as eyeliners rarely do much for me, but I own close to 10 of these. I struck gold with the EmeraldGold shade, which has stunning micro flecks of gold in it- super shimmery & gorgeous! I heavily lined my lower water line with it & topped with a few coats of mascara- easy peasy!

Happy St. Patrick's Day!
Peace.Love. Lipgloss.

Friday, August 10, 2012

Fabulous Finds Friday: Polish Pic{k}s Edition

While making a paper towel run recently in Walmart, a flash of fun colors caught my eye. Some of Maybelline's new Color Show nail polishes begged to come home with me. I scooped up #330 Tenacious Teal (very similar to Chanel's Jade if I remember correctly) & #350 Blue Freeze to add a little variety to my life. I dabbed Blue Freeze on with a tooth pick for polka dots to add a little whimsy to my manicure- you can use the end of a liner brush, as well. It's super easy.
I love the just-bigger-than-trial-sized bottles of polish. Who really finishes a whole bottle of polish before it becomes gooky & thick? I have one polish out of easily 50 shades that gets that much use. These bottles are a guilt free way of adding a dash of color into your life at under $3 a pop- at Walmart they were $2.97 a bottle! So go ahead- brighten your horizon!
Peace. Love. Polish. M

Wednesday, April 18, 2012

Polish Pic{k}s

I love me some Dita Von Teese. I think she oozes class, style & sensuality. I love her retro look - her skin, make-up & hair are flawless! She always wears a vintage inspired reverse moon manicure & I wanted to recreate the look. So I painted a base coat & then applied a coat of OPI's Lucerne-Tanly Look Marvelous.
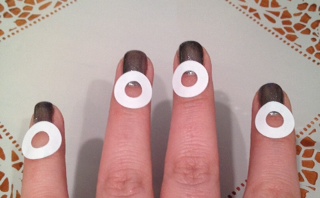
On Pinterest, every one said this style was easy to recreate. Just apply reinforcement labels where you want the reverse moon to go. Then on to the second coat of polish.
Liars! I start to get nervous as I apply the other color. The navy polish, OPI's gorgeous Light My Sapphire was very runny for some reason. I had some serious run off into my cuticles. I'm normally very good at polishing my nails, so this 'crafty' manicure attempt had me muttering an expletive or two or five.
Yes, this is the hot mess part. Certainly, no Dita here! Though in this picture it doesn't look awful. The problem is I couldn't get the round tabs to lie flat all the way across the nail. You also have to make sure the initial coat is very dry, or removing the round tab can pull up some of the inital polish coat. It didn't help that the navy was runny, but the tabs also weren't cooperating for me, either.
My remedy was to go back & cover the unevenness with a simple 'V' shape. I still like it & love the color combination- I just wish more of the silver was showing. I'm going to buy a nail polish pen & reattempt this in another color combo to see if it's any easier. I'll report back to you Beauties! In the meantime- what do you think?
Peace. Love. Polish. M

Monday, April 9, 2012

Must Have Make-Up Monday: GloMineral's Alloy Shadow Collection


I often buy shadow kits or compacts because they're such a great value. Sometimes however, you favor a few shades & the rest remain untouched. GloMinerals' Alloy Shadow Compact ($44) has nary a dud in sight, rather it's full of your classic go to shades for the perfect smokey eye. I love that the compact isn't huge either- it's roughly the size of my iPhone. Does anyone else think men must design some of the compacts out there? Because there is no way a woman would make a huge compact- we want to be able to throw it in our purse or take it with us when we travel, without it being super bulky!
For a quick smokey eye, I took the 2 shades in the upper right hand corner- Enigma & Tuxedo and patted them on the natural contours of my eyelid. Then I smudged what was left on the brush along my lower lash line. I used the bottom right shade, Jet, to line my lashes & lower waterline- then topped with mascara. This compact has simple neutrals for day & the intense versions for night- it's a win win. In fact, I'll probably have this compact on hand when I teach my Smokey Eye Class next week at La Papillon- there are only 3 spots left, so if you live in the Baltimore area grab one of the last remaining seats!

Peace. Love. Lipgloss. M
*Compact gifted for review

Monday, December 12, 2011

Easy Holiday Party Favors

As promised this is the easiest little tutorial to make holiday favors with peppermint bark! Besides holiday, you could easily change the cookie cutter to suit the themes of a baby or bridal shower.
First, I melted dark chocolate in the microwave. To cut down on mess, I used a gallon Ziplock bag for easy clean-up! When melting chocolate, microwave at medium heat at 30 second intervals. I massaged the bag at each interval to prevent the chocolate from burning & ensure even melting.
When it was uniformly heated, I snipped the end off the Ziplock & began piping the chocolate into the cookie cutters. This step will be covered, so it doesn't have to be gorgeous. You just want to make sure it's touching the sides of the cookie cutter.
Let the dark chocolate cool. Then on to the white chocolate, repeating the same melting process as with the dark. I used Wilton melting candies that I already had on hand for this step.
Same as before, you now pipe the white chocolate on top of the dark. Again, it doesn't have to look perfect since you'll be topping it with the peppermint. This is such a fun project to do with kids, too!
Unwrap & place candy canes in another Ziplock.
After unleashing the day's frustration out on the candy canes, this is what you are left with. I used a soup can to pound the bag out on the sidewalk.
Press the broken candy cane pieces into the white chocolate, while it's still warm.
Voila! To keep this project affordable, since I was making a lot of them I went to the Dollar Store for the cookie cutters. The metal tree cutter in the center was $1, but then I found the plastic ones you see in the tutorial that came 6 in a pouch for $1- score! Of course, on the other end of the spectrum you could do copper cookie cutters to make the favors more elegant.
Here they are wrapped & ready for holiday giving in a festive basket at the spa! For my first time making them, they turned out very pretty & they were a big hit. Let me know if you make these, I'd love to see your pictures!

Peace. Love. Peppermint Bark. M

Friday, December 9, 2011

Easy Holiday Hair How To

My areas of expertise lie in make-up & skincare, in fact I often say I'm hair challenged! However I do have a signature look & I'm always doing demos on clients. It's super easy- yes even I can do it! It's romantic & perfect for the holiday season- so of course I'm going to share it with my Beauties!
This easy updo works best with shoulder length hair or longer. Grab a stretchy headband- we carry Medusa's Heirlooms at the spa & that is what's shown in this tutorial. Start by placing the headband Olivia Newton John a la Let's Get Physical Music Video style across your forehead.
Back starting view.
Start at one end, by taking small sections & simply tucking it into the band of the headband.
Repeat with additional sections, to follow & cover up the previous section. It doesn't have to be perfect- that's the beauty of it- just keep tucking!
The updo will take shape before your eyes, with very little actual effort- that's the best part.
This style works with all hair types. I love it on hair with slight wave & highlights- it really brings the dimension of the color out.
You can leave the back section perfectly plain or can add easy embellishments! I tucked a feather in for one look.
For another look, I stuck a flower pin in her hair - the sky's the limit creatively speaking! I was even thinking a small, tasteful ornament could be gorgeous & unexpected for the holidays. To finish, just move the headband in the front to where you want it. For a Nicole Richie vibe, leave it as is. For a Grecian goddess vibe, pull it up like a traditional headband(refer to yesterday's post to see Brianne wearing it that way.) Whichever way you wear it, I promise you- you'll get tons of compliments. Now go forth & be pretty!

Peace. Love. Lipgloss. M